Extracts from my PhD ThesisThis series of posts provides a step-by-step description of the construction and conversion processes involved in building the Container of Dreams. They outline my studio investigations and experimentation and document both accomplishments and failures experienced throughout the project. PART 2:Rooftop Deck To construct the rooftop deck, I first calculated the amount of timber required to assemble the framework. I decided to fabricate the frame directly onto the roof of the container using standard pre-cut 2400 millimetre treated pine sleepers as joists, which I purchased from Bunnings. The use of standardised timber was elected for convenience as the width of the container is also standardised at 2400 millimetres and the timber could be placed directly on the roof with no alterations needed. The sleepers were placed on the roof on their ends spaced at forty-five (45) centimetres apart as required by the installation instructions supplied by the manufacturer of the decking material. The pictured image shows the timbers being placed onto the roof of the container. Using the cordless drill which had been donated to the project by AEG Powertools, the joists were then secured to each other using framing timber which was screwed along the outside edge of the deck area and then also attached to the stud framing timbers using screws. 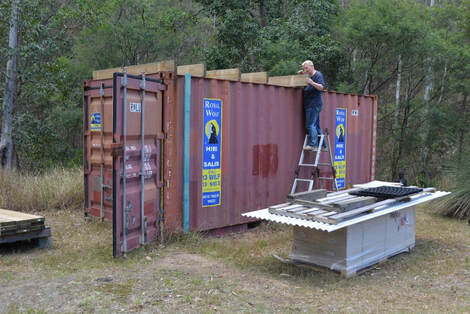 Timber joists being installed on container roof Once all the timbers were secured into place, I then installed the insulation. The insulation was donated to the project by CSR Bradford and was described by them as medium density glass wool insulation boards, which consist of large sections of fibreglass wool insulating material. As the roof joists were spaced at forty-five centimetre distances, the insulation material had to be cut to size. Each gap had to be measured individually and each piece of insulation cut to fit and then put in place. After the insulating material was installed, I then placed a layer of builder’s film - a black polythene sheet - over the whole area, leaving a reasonable amount of overhang on each side. The overhang was to allow the moisture barrier to be continued on the outer walls and to permit moisture run-off. The next step was to then cover the whole expanse of the roof top with large sheets of Inex Wallboard. The Inex Wallboard was generously donated to the project by UBIQ and The Green Building Centre in Byron Bay. It is a low carbon, advanced high strength and fire reinforced cladding material for interior or exterior applications. It is made from a composite cement product which contains approximately sixty percent (60%) of post-industrial recycled materials, known as Engineered Cementitious Composite (ECC) (UBIQ 2018). The sheets supplied to the project were 1200mm x 3000mm. This size made them very awkward to handle. Due to their length and the material they were manufactured from they were inclined to crack easily in the centre if not handled with caution. They were also heavy at fifty-seven kilograms (57kg) per sheet and difficult to manoeuvre into place. For the challenge of positioning these sheets onto the roof I needed to engage another pair of hands to assist me, so I asked my partner, Cass to help. We tried several differing approaches to try to get the boards on to the roof and I have to say that we struggled with each effort. Regrettably, after numerous attempts to lift these large heavy sheets onto the roof of the container, the plan was abandoned. Had I had access to the use of scaffolding, a scissor lift platform or such like (contemporary construction site practices) this would perhaps not have been such a problem. Unfortunately, this was a small-scale project on a very tight budget so having these extra building tools was not an option for me. A different solution was necessary, and after much consideration, I decided that the builder’s film would suffice as a moisture barrier under the decking boards, as long as the decking boards were then treated with adequate waterproofing. 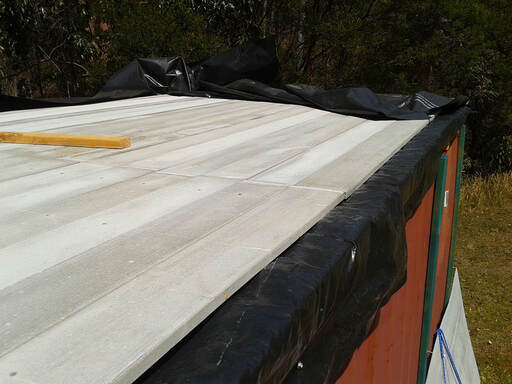 Installing the decking boards onto the rooftop The decking material used were Inex Decking Boards which were very generously donated to the project by UBIQ and The Green Building Centre, Byron Bay. These are made from the same composite cement product as the wallboard. The decking boards supplied to the project were 2700mm x 140mm and were only nine kilograms (9kg) per length which made them lightweight enough and straightforward to place on to the roof. The boards were screwed into position on to each roof joist using masonry self-drilling screws, eliminating the need to pre-drill the holes. I observed this to be a time-consuming and laborious task and I was left feeling aching and drained from the repeated boring of fasteners. However it was an uncomplicated task and easily achievable for a solitary operative. Once the boards were fixed into place they were coated with Sikalastic 560, a polyurethane waterproof membrane, also donated to the project by Sika Australia. It is a liquid product which was painted on, requiring three coats. It is non-toxic and resistant to ultra-violet radiation. As an added advantage, the product creates a reflective coating which improves energy efficiency and insulating properties. 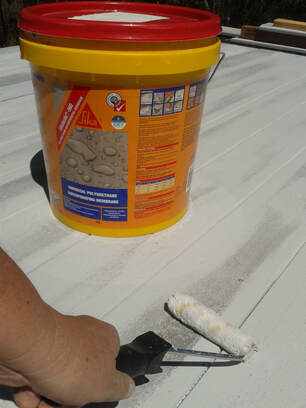 Coating the rooftop deck with Sikalastic I hope you are enjoying reading about the process of my container conversion.
Next week, in Part 3 of this series, I will discuss the process of applying the exterior cladding to the container. Stay tuned...
5 Comments
Peter Wooldridge
8/8/2019 04:43:57 am
I'd be curious to know whether planning, building and maybe environmental health consents have been obtained. I'd be interested to know how the building meets energy efficiency requirement, adresses head height and general engineering standards and how effluent (grey and black) are proposed to be teated. Based on the above pictures, oonding of water on the roof and its concomitant effects maybe an issue. In any event I look forward to the next installment and goid luck 8/8/2019 09:24:01 am
Thanks for your comments Peter. This was completed as an art project and was not meant to be a fully resolved or approved dwelling, although it is noted that it could easily be rendered compliant if necessary. It is a prototype to be referred to for future planned projects.The head height is legal (for our area) also. 12/3/2024 07:04:48 am
The article "Building the Container of Dreams" provides an insightful look into the construction process of the Container of Dreams project. It offers valuable details and updates on the progress made, showcasing the dedication and hard work of the team involved. Through this article, readers gain a deeper understanding of the project's goals and the transformative impact it aims to achieve. It's inspiring to see how this initiative is shaping up to create positive change and provide hope for the future. 15/4/2024 10:07:04 pm
Your blog about building the Container of Dreams is amazing! I learned so much from reading it, and I'm grateful for the helpful information you shared. Keep up the great work! Leave a Reply. |
Clare UrquhartCEO and Founder Archives
March 2020
Categories |
 RSS Feed